How to Tie a Perfection Loop: A Neat Loop in Line with the Leader
Tie the perfection loop for loop-to-loop leaders and rigs: a small, strong loop that sits straight in line with the standing part.
The perfection loop makes a small, neat, fixed loop at the end of a line. Its big advantage over quicker loops is how it sits: the loop comes out straight in line with the standing part, not angled off to one side. That makes it ideal for loop-to-loop leader connections, where you want the leader and line to pull in one straight line. It takes a few tries to learn, but once you have it, it is quick to tie and very reliable in mono and fluorocarbon.
When to use the perfection loop
- Loop-to-loop leader connections, so you can change leaders without retying to the main line.
- The butt of a fly leader, joining it to the loop on a fly line.
- Small end loops on rigs, for clips, sinkers and swivels.
- Any time you want a loop that lies straight, without a kink at the knot.
For a quicker loop that does not need to be so neat, the surgeon's loop is easier. For a loop in the middle of a line, use the dropper loop knot. For a loop at a lure eye, use the non-slip loop knot.
How to tie the perfection loop

Take the tag end around behind the standing line to make a small loop.

Make a second, larger loop in front of the first. This sets the size of the finished loop.

Lay the tag across between the two loops, in front of the standing line.

Reach through the first loop, pick up the second and pull it through.
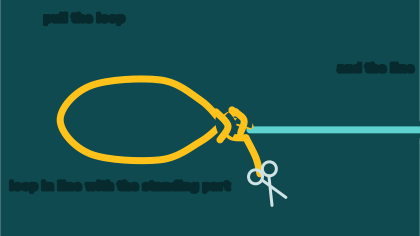
Wet it, pull the loop and the standing line until it locks, and trim the tag.
Understanding the moves
The perfection loop is built from two loops and one tuck:
- The first loop is made by taking the tag around behind the standing line.
- The second loop is made in front of the first. Its size sets the size of the finished loop.
- The tag is laid between the two loops, in front of the standing line.
- The second loop is pulled through the first. This is the move that locks everything.
The most common mistake is to make the second loop behind the first instead of in front of it. If the knot falls apart when you pull, check that order first.
Controlling the loop size
The finished loop is a little smaller than the second loop you made. If you need an exact size, for example to match the loop on a fly line, practise a few times with the same line and note how big the second loop needs to be. Once the knot is pulled tight, the size is fixed.
Seating the knot
Wet the knot. Hold the loop with one hand and the standing line with the other and pull steadily. The knot draws down into a compact shape with the tag sticking out at a right angle. Pull the tag a little to tidy it, give a firm final pull on the loop and the line, and trim the tag to 2 to 3 mm.
Loop-to-loop connections done right
To join two loops, pass the loop of the leader through the loop on the line, then pass the whole leader (or the hook end) back through the leader's own loop. Pull the two lines apart. Done correctly, the two loops lock together like a reef knot, flat and neat. If one loop slides over the other and cuts in (a "girth hitch"), undo it and connect again. A clean loop-to-loop lets you swap leaders in seconds, which is useful when you change from a light leader to a heavier one; see how to choose a fishing leader.
Strength and line types
A well-tied perfection loop keeps a high share of line strength in monofilament and fluorocarbon. In braid it is less reliable because braid is slippery and the knot can slip before it bites. For a loop in braid, use a Bimini twist or an Australian braid.
Tips
- Practise with thick line, so you can see which loop is in front.
- Keep the second loop in front of the first.
- Wet it before tightening.
- Pull steadily, not in jerks.
- Leave a tidy tag; a long tag catches weed.
Common mistakes
- Making the second loop behind the first.
- Laying the tag on the wrong side of the standing line.
- Pulling the first loop through the second instead of the second through the first.
- Tying it in plain braid, where it can slip.
The perfection loop is worth learning even if you only use it for leaders. A straight, neat loop makes loop-to-loop connections look and work the way they should.
Identify your catch with ReelScan: snap one photo to get the species, size and safety notes, and earn points. Scan a fish.
Summary
The perfection loop gives a small, strong loop that sits in line with the standing part. Make a loop behind the line, a second loop in front of it, lay the tag between them, and pull the second loop through the first. Use it for loop-to-loop leaders and small end loops in mono and fluorocarbon, and choose the surgeon's loop when speed matters more than neatness.