How to Tie a Nail Knot: Join a Thin Line to a Thick One
Tie the nail knot with a tube to join a leader or backing to a thicker line: smooth through the guides, step by step, with tips.
The nail knot joins a thin line to a thicker one with a smooth, slim barrel of wraps. It got its name from the nail that anglers once used as a tube to help tie it; today a small hollow tube, a drinking straw or a dedicated tool does the job. It is the standard way to join a leader or backing to fly line, and it is also useful for joining mono to a thicker line when you want a knot that slides smoothly through rod guides.
When to use the nail knot
- Leader butt to fly line, the classic use.
- Backing to fly line or backing to the reel spool line.
- A thin line to a much thicker line, where you want a smooth, slim join.
- When the knot must pass through guides without catching.
For joining braid to a mono or fluorocarbon leader in spinning and casting, the FG knot and Albright knot are more common. For two lines of similar thickness, the blood knot is simpler.
How to tie the nail knot
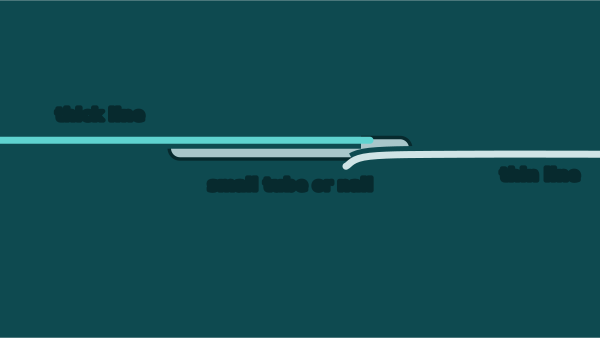
Lay a small tube along the thick line, and the thin line along both, overlapping by about 15 cm.
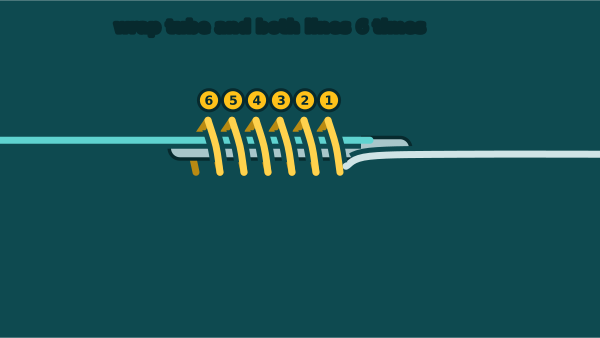
Wrap the thin line back over itself, the tube and the thick line 6 times, each turn tight beside the last.
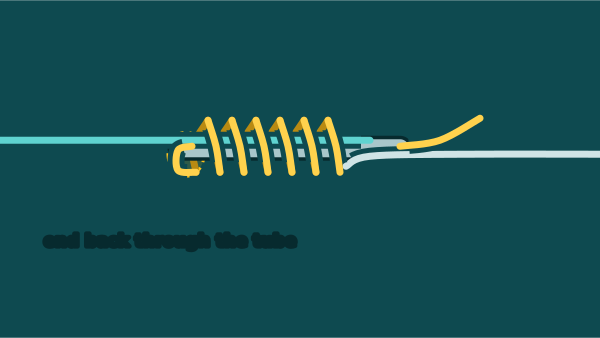
Push the end into the tube next to the last wrap and through it, under all the wraps.
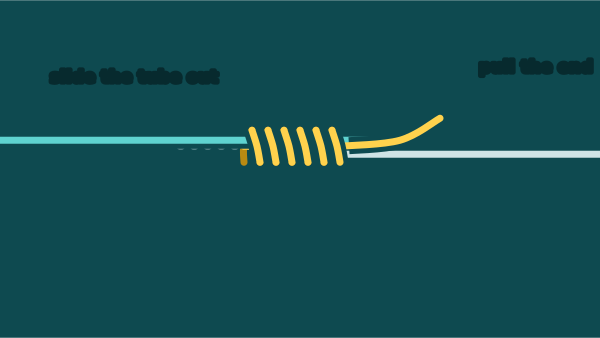
Hold the wraps, slide the tube out, and pull the end to snug the wraps down.
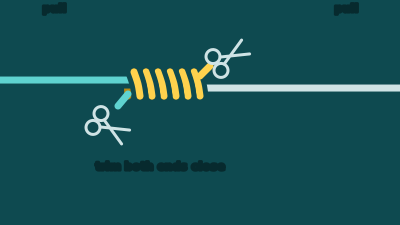
Wet it, pull both lines hard, and trim both ends close.
What the tube is for
The tube is the trick that makes the nail knot easy. After you wrap the thin line around the tube and the thick line, the end of the thin line has to go back under all the wraps. Without a tube, that is almost impossible. With a tube under the wraps, you simply push the end into the tube next to the last wrap and through it. Then you slide the tube out, and the end is left exactly where it needs to be.
Any small hollow tube works: a coffee stirrer, a cut-down straw, a ballpoint pen refill tube, or a purpose-made nail knot tool. A plain nail works too, but you must then hold the end alongside the nail while you pull it out.
How many wraps
- Most combinations: 5 to 7 wraps.
- Very thin line on thick line: up to 8 wraps.
- Heavy leader: 4 to 5 wraps.
Every wrap should sit tight and beside the last. Overlapping wraps make a lumpy, weak knot.
Seating the knot
Hold the wraps firmly between finger and thumb while you slide the tube out. Then pull the end of the thin line gently to snug the wraps down, and pull the thin line's standing part as well. Wet the knot and pull both lines hard. The wraps should form a smooth, even barrel that grips the thick line. Trim both ends close.
Making it smoother
On fly lines, a drop of flexible glue or UV knot coating over the nail knot makes it even smoother through the guides and protects it from wear. This is optional, and the knot holds well without it when tied correctly.
Nail knot for backing
Many anglers use a nail knot to join backing to fly line, or to join a running line to backing on a reel. When you set up a reel, also check how much backing you need; see line capacity and backing.
Tips
- Overlap generously, about 15 cm, so there is room to work.
- Wrap toward the end of the thick line that will face the leader.
- Keep wraps tight and side by side.
- Hold the wraps while removing the tube.
- Wet it before the final pull.
Common mistakes
- Losing the wraps when the tube comes out.
- Overlapping wraps.
- Not pulling both ends of the thin line to seat the wraps.
- Using it for braid to leader in spinning, where other knots are better.
A nail knot looks hard, but with a tube it is one of the most reliable joins you can tie. Tie a few at home, and it becomes routine.
Identify your catch with ReelScan: snap one photo to get the species, size and safety notes, and earn points. Scan a fish.
Summary
The nail knot joins a thin line to a thicker one with a smooth barrel of wraps. Lay a tube alongside the lines, wrap the thin line around everything 5 to 7 times, push the end back through the tube under the wraps, slide the tube out and pull everything tight. It is the classic leader and backing knot for fly lines and a useful smooth join for any thin-to-thick connection.