How to Tie the Improved Clinch Knot (Step by Step)
Tie the improved clinch knot step by step: the classic knot for tying hooks, lures and swivels to monofilament and fluorocarbon line.
The improved clinch knot is one of the most widely used fishing knots in the world. It is quick to tie, easy to learn and strong enough for most hooks, lures and swivels on monofilament and fluorocarbon line. If you only learn one knot to tie a hook, make it this one. This guide shows you how to tie it step by step, explains why the "improved" tuck matters, and tells you when to choose a different knot.
What the improved clinch knot is used for
- Tying a hook, lure or swivel to monofilament or fluorocarbon line.
- Line strengths from very light up to around 30 lb. Above that, the wraps become hard to tighten neatly and a uni knot or a crimp is usually better.
- Everyday fishing from piers, beaches and boats for fish such as bluefish, seabass, snapper and spotted seatrout.
It is not the best knot for braided line, which is too slippery and can pull through. For braid, use the Palomar knot instead.
Why "improved"?
The basic clinch knot ends after the tag end goes through the small loop near the eye. Under heavy load, especially with modern slippery lines, it can slip. The improved version adds one extra step: the tag end is tucked back through the big loop that forms on the side. That extra tuck locks the knot and adds real strength.
How to tie the improved clinch knot
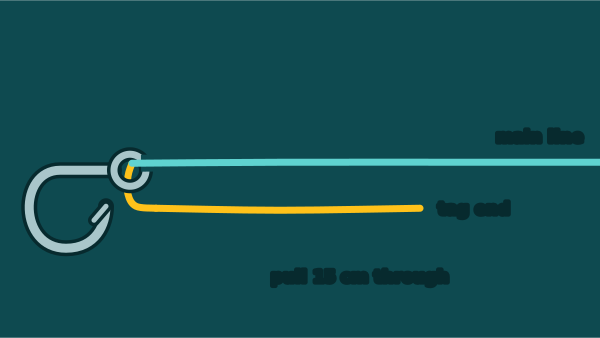
Pass the end of the line (the tag end) through the eye of the hook and pull through about 15 cm.
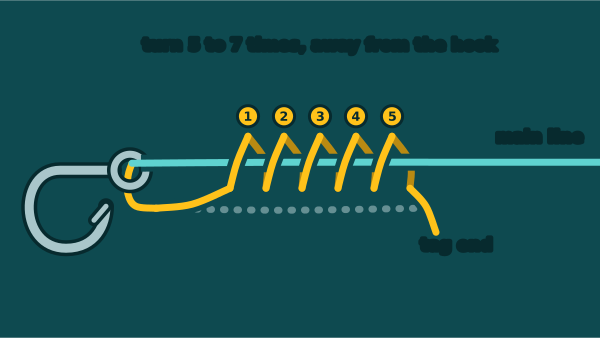
Hold the hook and wrap the tag end around the main line 5 to 7 times, turning away from the hook.
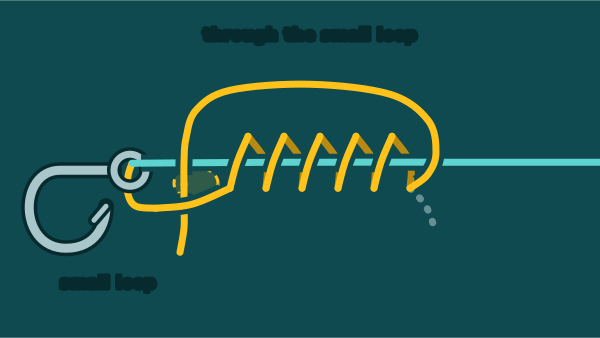
Pass the tag end back through the small loop that formed just above the hook eye.
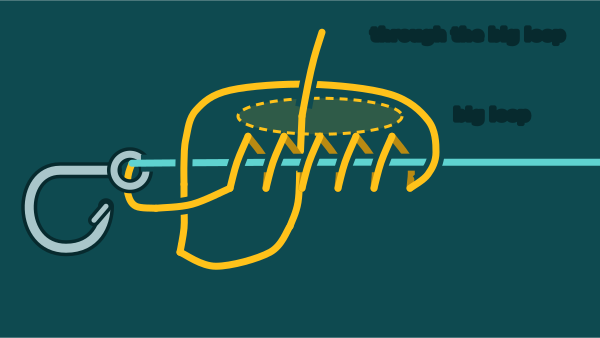
Now pass the tag end through the big loop you just created on the side. This extra tuck is what makes it "improved".
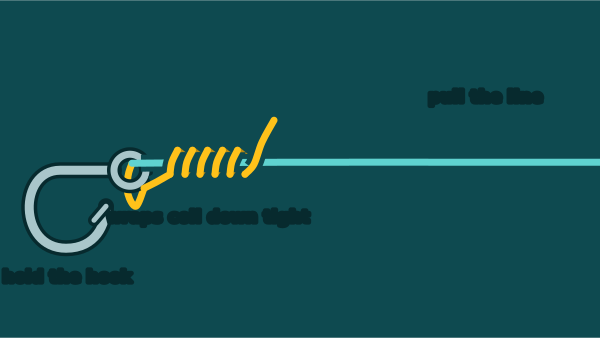
Wet the knot with water or saliva, then pull the main line and the hook slowly in opposite directions until the wraps coil down tight.
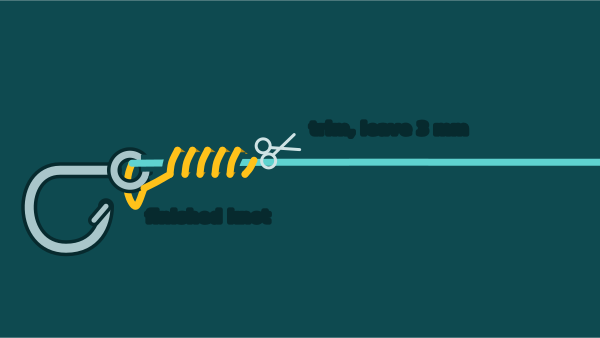
Trim the tag end to about 3 mm and check the knot by pulling hard.
Tips for a strong clinch knot
- Use 5 to 7 wraps. Use more wraps (6 to 7) with thin line and fewer (4 to 5) with heavier line, which is harder to snug down.
- Always moisten the knot before tightening. Friction from a dry knot creates heat that weakens monofilament and fluorocarbon, and wet line slides into place neatly.
- Tighten slowly and firmly. Pull steadily so the wraps coil down evenly and sit together like a barrel. Crossed or uneven wraps are a weak knot.
- Leave a small tag. Trim the tag end to about 3 mm. Cutting it flush can let the knot slip; leaving it too long catches weed.
- Test every knot. Give it a firm pull before you cast. A knot that fails in your hands would have failed on a fish.
Common mistakes
- Forgetting the improved tuck. The knot looks fine but can slip under load.
- Too few or too many wraps. Too few and the knot slips; too many with heavy line and it will not seat properly.
- Not wetting the line. This is the most common cause of a weak clinch knot.
- Pulling only the tag end. You must pull the main line and the hook apart to seat the coils; the tag end only holds the shape.
- Using it on braid. Braid needs a different knot.
How strong is it?
When tied correctly, the improved clinch knot keeps a high percentage of the line's rated strength with monofilament. Strength drops quickly if the knot is tied dry or with crossed wraps. If you fish heavy fluorocarbon or need maximum strength, consider the uni knot, which seats more easily in thicker line, or the Palomar knot. Knot strength matters because it is usually the weakest point in your system; read the fishing line strength guide to understand why.
Improved clinch knot vs other knots
- Palomar knot: stronger and better for braid, but you must pass the hook or lure through the loop, which is awkward with large lures or treble hooks.
- Uni knot: works with any line, is easier to tighten with heavy line, and can also be used for line-to-line connections.
- Loop knots: let lures swim more freely. Use them for jerkbaits and small swimbaits.
Many anglers use the improved clinch for everyday hooks and swivels on mono and fluoro, the Palomar for braid, and the uni for heavier leaders.
Using the clinch knot in a rig
The improved clinch is ideal for tying the hook on a bottom rig, a float rig or the swivel in a fish finder rig. It also works for attaching your leader to a swivel when you are not using a direct line-to-line knot. Learn how to choose the hook itself in types of fishing hooks.
Practise at home
The best time to learn a knot is at home, not on a rocking boat with cold hands. Practise with a short piece of thick line and a large hook until you can tie it with your eyes closed. Then practise with your real fishing line and hooks. After ten to twenty repeats, it becomes automatic.
When to retie
Retie your knot after every big fish, after any snag, whenever you change lures several times, and at the start of each trip. Run your fingers over the last metre of line; if it feels rough or kinked, cut it off before retying.
Identify your catch with ReelScan: snap one photo to get the species, size and safety notes, and earn points. Scan a fish.
A knot that holds, a catch that counts
Once your clinch knot brings the fish to hand, let ReelScan take it from there. Photograph the fish with your camera to identify the species, check its size range and any spines or teeth to watch out for, and earn points on the leaderboard. Every real catch you log builds your personal fishing record.
Summary
The improved clinch knot is the go-to knot for tying hooks, lures and swivels to monofilament and fluorocarbon. Pass the line through the eye, make 5 to 7 wraps, tuck through the small loop, tuck again through the big loop, wet the knot and pull it tight. Use the Palomar for braid and the uni for heavier lines, and always test your knot before you cast.